


Last Updated on July 21, 2023 by
Dealing with WiFi connectivity troubles in your house or office? If sure, the Netgear EX6100 AC750 WiFi range extender will certainly be your best bet. Netgear AC750 EX6100 extender comes with dual-band functionality, offering WiFi speeds up to 750 Mbps and covering as much as 100-150 ft of distance. Now the query rises, how to perform Netgear EX6100 setup for faultless internet connectivity.
Well, we’ve got your back! In this write-up, we will guide you through the complete installation of your Netgear EX6100 AC750 WiFi range extender. Allow us to explain to you in detail.
Table of Contents
Netgear EX6100 WiFi Extender Setup
Netgear EX6100 extender installation can be done in two modes: Extender Mode and Access Point Mode. Given below are the steps required to set up Netgear AC750 EX6100 extender with great ease.
Netgear EX6100 AC750 Setup As An Extender
While operating as an extender, Netgear EX6100 boosts the current wireless signals and enhances the overall signal strength over long distances. Here are the instructions to set up your Netgear EX6100 extender as a WiFi extender:
- Initially, plug the EX6100 AC750 WiFi extender into a wall socket and power it on.
- Connect your Netgear extender to the router with the aid of an Ethernet cable.
- Now, open an internet browser for your laptop or computer.
- Make sure to employ an updated web browser. You may pick any browser like Google Chrome, Mozilla Firefox, Internet Explorer, or Microsoft Edge.
- Visit mywifiext local web page.
- Insert the user ID and password into the given fields.
- Click on the Log In button.
- In the event that you fail to log in to your Netgear AC750 EX6100 WiFi range extender, update your web browser, clear its cache, cookies, and browsing history, and try again.
Quick Tip: Just in case mywifiext.net not working for you, cross-check the web address you are using. There should not be any kind of typos in the entered web URL.
- Once logged in, the Netgear genie setup wizard will come into view.
- After that, input the SSID and password of your home WiFi network.
- Click on the Continue button.
- Input the security settings for your Netgear EX6100 AC750 WiFi range extender and hit Continue.
- At last, click on the Finish button.
Voila! You have completed the Netgear EX6100 WiFi range extender setup. Now, connect all of your WiFi-enabled devices to the new, extended network and enjoy fast-speed internet everywhere in your house or workplace.

Netgear EX6100 Setup As An Access Point
As soon as you set up your Netgear AC750 extender as an access point, it makes a new WiFi hotspot within your local network. To set up Netgear extender AC750 EX6100 as an access point, consider the steps mentioned underneath:
- Plug your Netgear AC750 EX6100 WiFi range extender into an electrical outlet and turn it on.
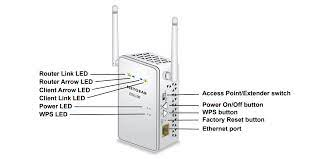
- Set the extender switch to Access Point.
- Connect your device to Netgear_ext SSID.
- Now, use an Ethernet cable and make a wired connection between your extender and router.
- Once executed, visit the default Netgear extender setup web page via an internet browser.
- Fill the username and password into the given fields and hit Log In.
- Once logged in, a dashboard will appear.
- Set up the security settings for your WiFi extender and click on Continue.
- Thereafter, walk through the on-screen Netgear EX6100 setup commands to install your extender.
There you are! Now, you know how to set up and install Netgear EX6100 AC750 WiFi extender properly. On the off chance if you get stuck at any step while setting up your Netgear AC750 extender, get in touch with our veteran professionals.
Apart from that if you want to know about How do I Fix Netgear Authentication Error then please visit our Technology category.


