


Last Updated on August 3, 2022 by
How to draw car drawing. The Fiat 500 is a mythical car, a symbol of Italy’s postwar economic rebirth. Thanks to its simple, friendly, and carefree design, it has entered the hearts of all Italians! As a result, it is recognized as a style icon at an international level. In addition, it is an ambassador of “Made in Italy” design globally, so much so that it is recently possible to admire it at the MOMA in New York. For these reasons, we have chosen it as the subject for our first guide dedicated to the world of car design. So today, we will draw a fiat 500 together using pencils and markers!
Table of Contents
Draw the legendary Fiat 500
Below is the list of materials we will use in this tutorial. We will work with a mixed technique, using both pantones and colored pencils. As Pantone’s (or markers, for those who call them that), we will use the Winsor & Newton ProMarkers. They have a double tip, are acceptable for detail and chisel to cover larger areas, and are perfect for this type of design as they have high hiding power. In addition, they can be easily mixed, which is very important for obtaining smooth and homogeneous shades. Studio colored pencils are also Winsor & Newton. We will need them to create shades where it was not possible with the marker.
Also, read about landscape drawing
The sketch pencils used are simple graphite pencils in 2B and HB hardnesses. Finally, the card, guess what brand I used? It’s exact always the same! It is a very light paper (75g / m2) but specifically designed to bring out the liveliness of promarker colors in the best possible way. You can find it in A4 and A3 formats. I prefer to use the A3 form to perform the details best, but you can choose the format you prefer.
The pencil drawing of the 500

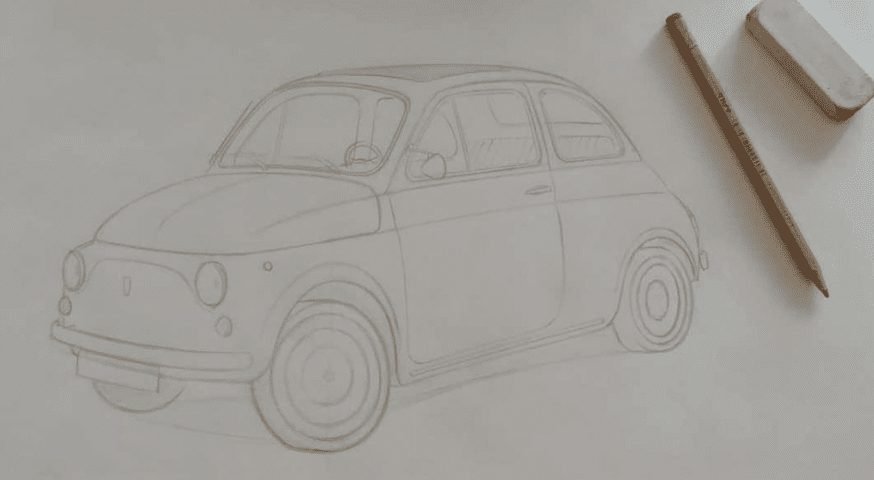
Very well, the most significant point to make is to draw our 500 with graphite pencils. Let’s start with a piece of advice: do not immediately remove the sheet from the drawing pad. I worked with the sheet still attached to have a more stable surface and avoid bending. But careful not to use also much weight with the pencils not to mark the underlying sheets. Where do I start with the drawing? I prefer to withdraw from the wheels and then sketch the outline of the car. In this phase, I use the 2B pencil, keeping a light stroke.
Immediately after, I add other details such as the windows, the door, and the headlights. Or the rims. In this case, the car has edges that are easy to draw, so we will only draw 3 circles per wheel. Minor premise regarding the proportions: the best advice I can give you is to practice and practice again. It may look a small frustrating at the front, but only with time will you notice that your efforts have paid off!
When you are satisfied with the draft made with the softest pencil, go over everything with the 2H pencil. Add other details like the interior, the sunroof, the bumpers, and the hood. Here we are. Our 500 is almost ready for some color! But first, with the Micron fine liners (from 005 and 02), we go over the wheels, windows, license plate, and roof. Perfect! Now we can finally use ProMarkers!
Let’s start coloring the Fiat 500
In this first step, we will use the following ProMarkers: Black (XB), Ice gray 4 (IG04), Storm Cloud (BG05), Berry Red (R665). Next, we begin to spread the Red on most of the bodywork; we use the fine tip to trace the outline, while with the chisel tip, we give the color. Next, spread the paint with horizontal movements from left to right in such a way as to cover the stroke of the marker passage. You can also give more layers of color – decide based on how satisfied you are with the result. Then with black, we fill the wheel arches and the front wheel, while with the two shades of gray, we color the other two wheels and the car’s shadow.
Step two: let’s color the light areas with pink
Let’s take the Rosa Antico (R346), and with the fine tip, we spread the color around the windows, while with the chisel tip, always with the same method, we go to add color to the rest of the door and on the lower part of the hood. To obtain continuity in the drafting from one shade to another, go over with pink on the leg already marked with red previously to “amalgamate” the two shades and avoid creating a detachment effect. The best result will obtain if the color is not completely dry yet. Finally, with the Rosa Cocktail (R438), we will add color to the rest of the hood.
Step Three: We complete the front
We have to complete the front of our super 500! Let’s take the Rosso R666 and spread it on the front of our Cinquino; we continue taking the Rosa Antico R346 and fill in the last stretch that remains. Finally, to give the bonnet more “body,” let’s assume the Rosso Carmine R156 and go over the time that we had gone to cover with the pink cocktail.
Step four: the interior and the headlights
It’s time to paint the interiors and headlights. Let’s take the Storm Cloud BG05 and go over the seats, the canvas roof, and the window surrounds. With black instead, we go to color the steering wheel and the part above the seats. Then, we take the Ice Gray 1 (IG1) and spread a color base on the bumper, headlights, mirror, and chrome frames (i.e., the front window and sill strip).
Step five: the rims
The last step with the Promarkers will allow us to complete the rims. We color the chrome cup using the Ice Gray 1, while with the Berry Red (R665), the rest of the rim. Be careful to leave the white band around the wheel, typical of vintage cars!
The complete drawing of your 500!
Congratulations, your racing car is ready! How does the result look to you? I’m sure it will be great. I believe you chose this tutorial also that it was easy to follow.


