

Last Updated on November 2, 2026 by juliettemarshall
Making picture frames at home lets you control the size, wood, color, and final look. The project also teaches useful measuring, cutting, and joinery skills. Beginners can get clean results by focusing on accuracy rather than complicated tools.
Quick answer: Start with straight frame stock, measure the artwork and backing, then cut matching side pairs. Join the corners carefully, check the frame for square, and let the glue cure fully. Finish by sanding, painting or staining, adding the artwork package, and installing suitable hanging hardware.
Table of Contents
Picture Frame Project at a Glance
| Detail | Beginner Recommendation |
|---|---|
| Skill level | Beginner to intermediate |
| Typical project time | One afternoon, plus glue and finish drying |
| Main material | Pine, poplar, oak, or frame molding |
| Basic joint | 45-degree miter joint |
| Easier alternative | Square butt joints |
| Essential measuring tools | Tape measure, pencil, square |
| Cutting options | Miter saw or miter box with handsaw |
| Assembly | Wood glue and a band or corner clamp |
| Backing | Hardboard, MDF, or suitable backing board |
| Glazing | Pre-cut glass or acrylic |
| Finish | Paint, stain, clear finish, or natural wood |
What You Need Before You Start
A basic frame does not require a large woodworking shop. Accurate measuring tools matter more than owning many machines. A simple miter box works well when you use it patiently.
For power-tool users, a miter saw makes repeated angled cuts easier. A square helps confirm the assembly before the glue sets. Clamps keep the joints from shifting while the glue cures.
Basic tools
- Tape measure.
- Sharp pencil.
- Combination or carpenter’s square.
- Miter saw, or miter box and fine-tooth handsaw.
- Sandpaper in medium and fine grits.
- Band clamp or four corner clamps.
- Safety glasses.
- Hearing protection when using power tools.
- Drill or screwdriver for hanging hardware.
Basic materials
- Straight, dry wood or frame molding.
- Wood glue.
- Pre-cut glass or acrylic.
- Backing board.
- Frame points, turn buttons, or suitable retainers.
- Picture hanger, D-rings, or hanging wire.
- Paint, stain, or clear finish if desired.
Straight lumber makes the project easier because warped boards fight against accurate joints. Pine and poplar are practical choices for painted beginner projects. Hardwood can provide a richer natural appearance but may cost more.
If you plan to paint your finished project, Readesh’s guide to house painting and paint choices offers useful background on paint types and preparation. The same principles of clean surfaces and suitable coatings apply to small wood projects. Good preparation often matters more than adding another coat.
Making Picture Frames in 8 Practical Steps
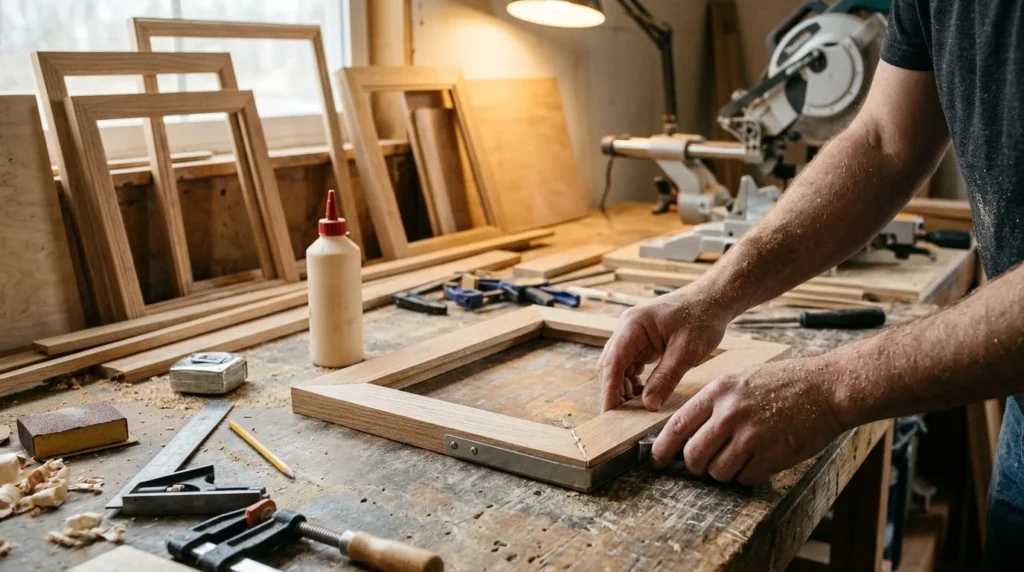
The best workflow keeps measurements consistent from the start. Opposite sides should match each other closely. Small cutting differences become obvious when four corners meet.
1. Measure the artwork and glazing
Measure the glass, acrylic, mat, or artwork package that will sit inside the frame. Use those dimensions as your working reference. Do not rely only on the advertised print size.
Allow enough space for the contents to fit without being forced. The artwork package should sit flat inside the rear recess. A tight opening can make assembly difficult or damage delicate materials.
2. Choose the frame width and wood
Narrow stock creates a simple, understated border. Wider stock gives the frame more visual weight. Consider the artwork size and room style before choosing.
Inspect every board before cutting it. Avoid badly bowed, twisted, or cracked pieces. Straight stock makes accurate miters and square assembly much easier.
3. Prepare the rear recess
Traditional wooden frames have a recessed area along the back inside edge. This recess holds the glazing, artwork, mat, and backing. Woodworkers commonly call this feature a rabbet.
You can buy molding with the recess already formed. Experienced woodworkers can also cut one with suitable woodworking equipment. Beginners without routing experience can choose pre-made molding instead.
4. Cut the first pair of sides
Set your saw for accurate 45-degree cuts when using mitered corners. Cut one piece, then use it as a reference for its matching opposite side. Matching lengths are more important than rushing through individual measurements.
Keep the finished face oriented consistently during every cut. Mark the inside and outside edges if that prevents confusion. Test your setup on scrap wood before cutting the final stock.
5. Cut the second matching pair
Repeat the same process for the remaining two sides. Both pieces in this pair should be identical in length. Afterward, check all four parts on a flat work surface.
Bring the corners together without glue for a dry fit. Look for visible gaps and check the overall shape. Fix inaccurate cuts before beginning assembly.
6. Glue and clamp the corners
Apply an appropriate amount of wood glue to each mating surface. Bring all four corners together and add the clamp. A band clamp is useful because it pulls inward around the entire assembly.
Check the frame with a square before the glue begins setting. You can also compare the two diagonal measurements. Equal diagonals indicate that a rectangle is square.
7. Sand and apply the finish
Allow the glue to cure according to its manufacturer’s directions. Remove the clamps before sanding the faces and edges. Work through suitable sandpaper grits until the surface feels even.
Paint works well when you want strong colors or need to hide inexpensive wood. Stain keeps more natural grain visible. A clear finish can protect attractive wood without changing its appearance dramatically.
DIY finishing mistakes can reduce the quality of an otherwise accurate project. Readesh discusses similar workmanship concerns in its article about home upgrade mistakes and DIY quality. Careful preparation and patient finishing produce a cleaner result.
8. Install the artwork, backing, and hanger
Lay the finished frame face down on a clean padded surface. Insert the glazing, artwork, or mat, and backing in the correct order. Secure them without applying excessive pressure.
Add the hanging hardware only after deciding which direction the frame will hang. D-rings and wire work well for many medium-sized wall displays. Choose hardware rated for the completed frame’s weight.
How to Get Cleaner Miter Joints
Perfect-looking corners depend on both angle accuracy and matching lengths. A saw set close to 45 degrees can still create problems when opposite pieces differ. Use repeatable stops or matching reference pieces whenever possible.
Dry fitting catches problems before glue makes them harder to correct. Place all four pieces together and inspect each joint under good light. Correct a small error now rather than hiding a large gap later.
Clamping pressure should close the joint without distorting the frame. Excessive force can pull a rectangular assembly out of square. Recheck the diagonals after tightening your clamps.
Can You Build a Frame Without Mitered Corners?
Yes, square-ended joints provide a useful alternative for beginners. Two pieces can run the full length while the remaining pair fits between them. This design avoids the precision required for four miter joints.
Another option uses overlapping pieces for a rustic or modern look. The exposed joint becomes part of the design rather than something to hide. This approach works especially well with simple painted wood.
Choosing a simpler construction method can be smarter than forcing an advanced joint. Readesh’s Home Improvement section covers many projects where planning and practical choices affect the result. The same idea applies to small workshop projects.
Glass or Acrylic: Which Should You Use?
Glass gives a traditional appearance and resists everyday scratching well. It can also be heavy and may break if dropped. Having a shop cut glass is safer for beginners without glass-cutting experience.
Acrylic is lighter and resists shattering better than ordinary glass. That makes it useful for children’s rooms, larger displays, and lightweight wall installations. Its surface can scratch more easily during cleaning and assembly.
Whichever option you choose, measure it before finalizing the wooden parts. Building around the actual glazing reduces sizing surprises. Keep protective film on acrylic until late in the assembly process.
Common Beginner Mistakes to Avoid
Small errors tend to become more visible as the project comes together. Careful preparation can prevent most problems. Watch for these common issues before reaching the glue-up stage.
- Measuring every matching piece separately instead of using one reference.
- Cutting before confirming the correct inside and outside edges.
- Skipping the dry fit.
- Using warped or twisted stock.
- Applying too much glue at the corners.
- Forgetting to check for square while clamping.
- Sanding aggressively across sharp decorative edges.
- Finishing the wood before correcting joint gaps.
- Installing hanging hardware without considering the final weight.
A frame can look simple while still demanding precision. Treat each cut as part of a four-piece system, not an isolated piece. That mindset prevents many alignment problems.
Creative reuse can also provide interesting material for decorative projects. Readesh explored that idea in a feature on turning discarded materials into furniture and decor. Reclaimed wood can work for frames when it is dry, stable, and safe to machine.
How to Size a Frame for Different Photos
Start with the dimensions of the glazing or artwork package, not the outside frame dimensions. The inner recess must accommodate those contents. Your molding width then determines the frame’s outside size.
For example, an 8-by-10-inch photo may sit behind a larger mat and glazing package. In that case, you build around the glazing dimensions rather than the photo alone. Measure the assembled display components before cutting wood.
Keep notes when you find measurements that work well. A simple project worksheet can record opening size, molding width, and cut lengths. That record makes future projects faster and more consistent.
Safety Tips for a Small Framing Project
Wear safety glasses whenever cutting or drilling wood. Use hearing protection with loud power tools. Keep your hands clear of blades and follow each tool manufacturer’s operating instructions.
Support longer stock before making angled cuts. A poorly supported board can move during cutting and throw off your measurement. It can also create unnecessary risk near a moving blade.
Do not rush unfamiliar operations. Practice on scrap pieces until the setup produces repeatable results. Get help from an experienced woodworker when a process exceeds your current skill level.
Frequently Asked Questions
Is making picture frames difficult for beginners?
It is manageable when you start with a simple design and accurate tools. The hardest part is usually getting four corners to meet cleanly. Square-ended joints offer an easier starting option if miters become frustrating.
What is the easiest wood for a beginner frame?
Straight pine or poplar is usually easy to cut, sand, and finish. Choose clean boards with minimal twisting or bowing. Stock condition matters as much as wood species.
Do I need a miter saw?
No, a miter box and fine-tooth handsaw can handle small projects. A powered miter saw makes repeated cuts faster. Accuracy remains necessary with either method.
Should I cut my own glass?
Beginners can avoid that extra risk by ordering pre-cut glass. Many hardware, glass, or framing shops can supply pieces to specified dimensions. Acrylic is another option when lower weight and break resistance matter.
How can I fix small gaps in mitered corners?
First, determine whether the problem comes from the angle or unequal side lengths. Recutting an inaccurate joint often gives a cleaner result than filling a large gap. Tiny cosmetic imperfections may be less noticeable after careful sanding and finishing.
What should I do if my frame is not square?
Loosen the clamps before the glue sets. Adjust the corners and compare the diagonal measurements again. Tighten gradually while checking the shape after each adjustment.
Build Your First Frame Around Accuracy
A successful DIY frame does not require complicated decoration. Straight stock, careful measurements, matching cuts, and patient assembly create the biggest improvements. Start with a small project before moving to wide molding or elaborate profiles.
Keep the first design simple enough to finish confidently. Once your cuts and glue-ups become consistent, experiment with different woods, colors, mats, and decorative edges. Each completed project builds skills you can use throughout other home and woodworking projects.